Availability Per Account Type
Trial
Lite
Pro
White Label
WL – Custom
Introduction
Archiving your livestreams are smart and using the Auto-Archive is the smartest way to operate your video management at a core level. Once you learn to properly auto-archive your livestreams, you’ll probably wonder how you operated so long without this feature.
Auto archiving critically affects your livestream player. So, make sure you fully understand how the auto-archiving feature works before using it. See the below Read Me First section before proceeding to use this feature. How critically? It can make your livestream player change into a VOD video player. There are two different modes of auto-archiving; make sure to choose the one that works best for you.
Read Me First
If this feature is turned on, clicking STOP on your livestream automatically saves the livestream as a VOD (video-on-demand). You will have the option to save your recorded livestream to the current player that was setup for the livestream to begin with (in affect changing the player from a livestream to a video-on-demand player), or to a new player, allowing the original livestream player to remain intact for future use.
- New Player – This will record your livestream to a new player. Allowing your viewers the ability to watch a recorded version of your livestream after the fact. This “recorded version” is ready within a few seconds of ending your active livestream. Recommended when you want to use a livestreaming player for multiple events and have them recorded.
- Current Player – This performs the same action as the “New Player” option but instead of making a new player this will change your current livestreaming player into a Video On Demand version of itself. Once your livestream ends, this player will be changed. It will now only show the recorded livestream. So if you want to reuse this player at a later date for another livestream make sure to pick the “New Player” option instead of this one.Recommended for one-off events.
Archiving a livestream has never been so easy. Simply turn this option on before a livestream and save your changes to the player, then run your stream as intended. When the event is finished, you will have a saved version of your livestream ready for playback.
Please remember that the search field in the upper right hand corner of this page is a great resource that we have specifically for you. If there is a question that this page did not answer, please use relevant keywords in that field– chances are good that we have something in our WIKI Knowledge base that could help you. If not, please contact us.
Warning 1 (Choose Wisely): Please make sure you double check what player type you are saving your stream to (New / Current). If you make a stream for a client and they embed the player onto their site chances are you will want to use the “New Player” option. Because the option “Current Player” could result in issues if you run a test stream before the main event, causing the livestreaming player to turn into a video on demand player ending up not allowing you to run the livestream from the intended player.
Warning 2 (Double Check): If you run a livestream test before a main event, then when it comes time to run the actual livestream if you are unable to get the livestream working chances are you might have selected to save the stream to the current player by mistake, saving your test stream over the livestreaming player.
Quick Tip: You can change a video on demand player into a livestreaming player by using the “Change Video File” option. Simply change the player back into a livestreaming player and you are good to go. Keep in mind this will result in a new stream name for this livestream but the player’s embed code will not need to be changed on a customer’s web site. The person running the livestream will just need to be notified of the new stream name they need to use in their livestream encoder application.
Archiving Your Livestream
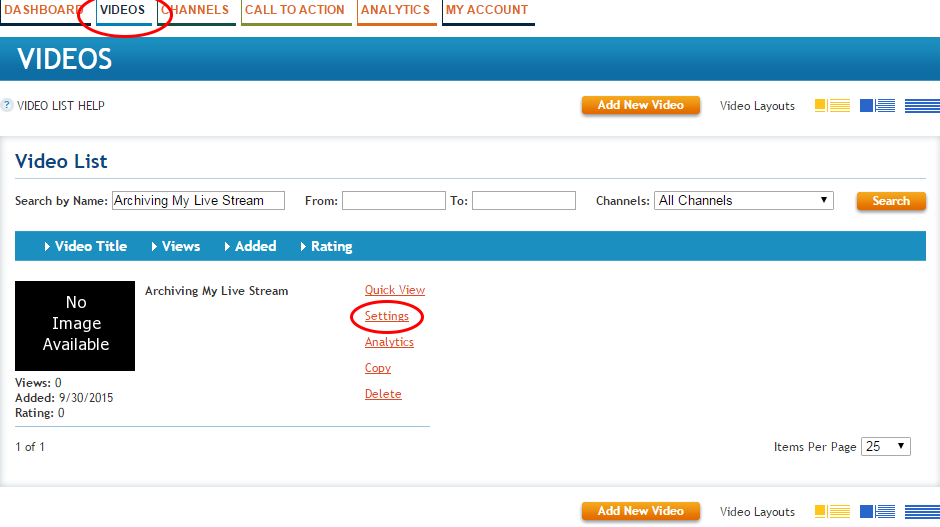
Step 1. From your VIDEOS page select Settings for one of your currently created livestream. Or create a new livestream.
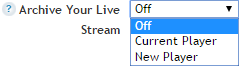
Step 2. Make sure you are on the Video Details tab. With in the Advanced Options you will find the option “Archive Your Livestream”.
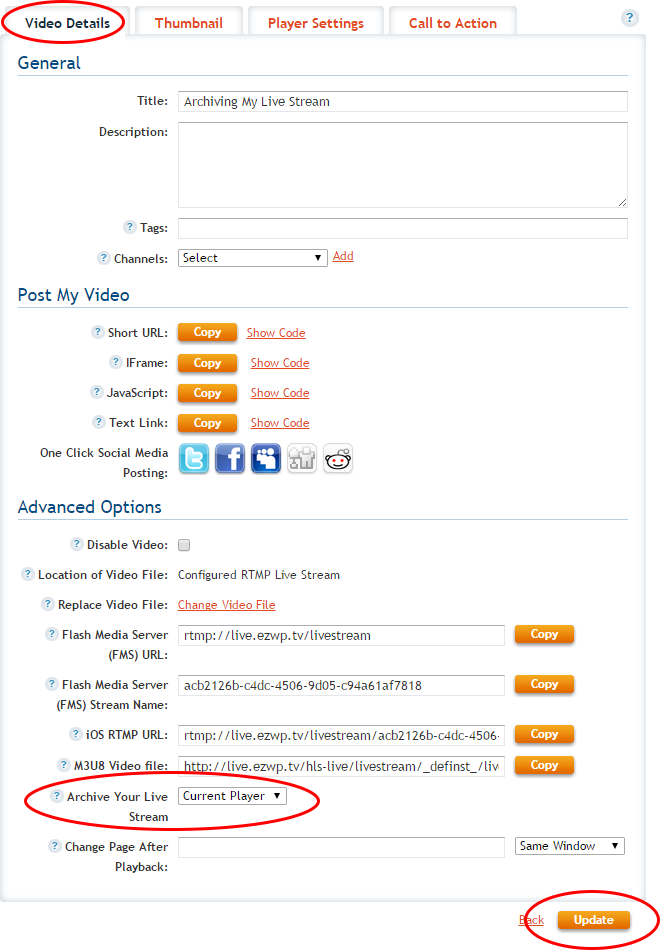
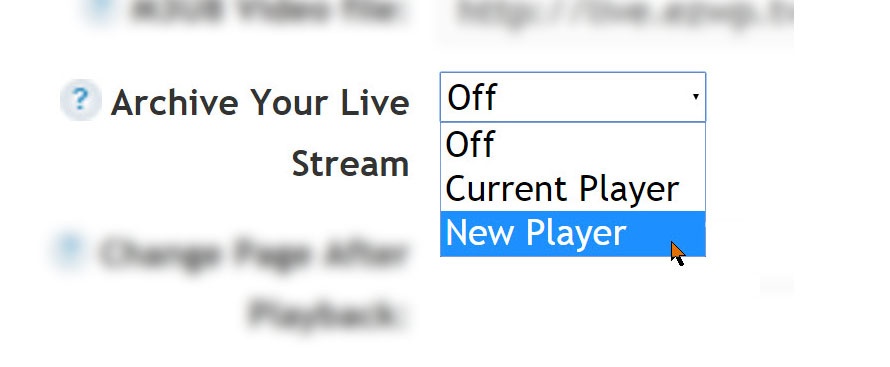
Step 3. Select how you would like to archive your livestream
- Off(default option)
- Will not archive your livestream.
- New Player
- Will archive your livestream to a new player that will show up in your video list with in the next minute after a livestream is over
- Current Player
- Will archive your livestream to the current player that will show up in your video list with in the next minute after a livestream is over
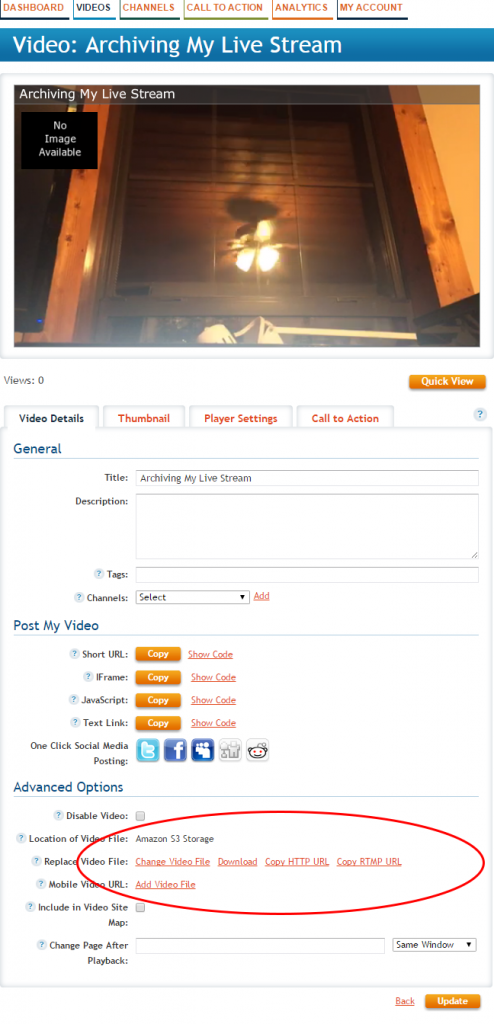
Step 4. Once your stream is over you will be able to view the archived livestream. This example was created using the Current Player option and was streamed using our iOS Livestreaming Application. As you can see in the Advanced Options, the settings for this player automatically changed from a livestream player to a Video On Demand player. Now this stream can be viewed at a later date. View the stream here.